Well, we've reached a pretty big milestone. The Interior renovations are largely complete.


I think it's looking pretty good.
Here are some of the highlights...
Completely updated layout
240v throughout for power - including uninterruptible power supply (we get a lot of trees falling over power lines up here in the hills).
12v lighting including LED strip lights recessed behind a panel in the ceiling.
Bamboo floor
Bar fridge
All new upholstery
2-pak high gloss desk
(Replica) Eames soft cushion executive chair.
Dinette that converts into a kids bed
Couch that converts into a double bed (retained and modified from original)


It's all a pretty big change from the original...

Let me know in the comments what you think or if there is any particular aspect you'd like to know more about.
Hi Matt, Love it ! Great job ! Any more mods as it is stage 1 ?
ReplyDeleteHey Erik,
ReplyDeleteWell, stage 2 is probably stripping and polishing the exterior.
Stage 3 is a deck.
Inside there are still a few things to do...
- I'm not totally happy with the way the dinette table works.
- I'm falling out of love with the colour of the cabinetry doors so there may be a change there.
- Still deciding on whether to do aircon
- Need to put flyscreens into the window frames before summer comes.
How are you going with your adventures?
Matt.
Hi Matt, Ours is in Japan, waiting for transfer, should be here end of August.
ReplyDeleteAm looking for an empty shell to start one from scratch .....
Did you build the cupboards frame with chipboard/melamine? I am looking at some lightweight materials.
I like your ceiling, how is that suspended, and do I see some handles on there?
Great job !
Erik
First thought is that I wouldn't start with an empty shell, for two reasons:
ReplyDelete1. Any walls, cupboards etc. that are in the existing trailer act as excellent templates for when you need to make your own. Shaping things into the compound curves on the inside is one of the hardest things to get right. Most cabinet makers won't take on the job because of this - they are used to just dropping kitchens into square walled houses. My cabinet maker used all of the interior walls and cabinets as starting templates. Don't underestimate how hard this is.
2. You may actually refurbish and re-use parts. All of our cabinets are re-painted. The pull out bed workings are re-used. The moulded in overhead cabinet at the front of the trailer are re-used. Countless screws (which are often of a different size to Australian ones), fittings, lights, wiring, 12v electrical, etc. are tucked away somewhere and re-used.
3. It usual doesn't cost much (if any) more to get one with a reasonable completely but possibly poor condition interior.
Sure, we threw plenty - more than half - of our interior away but until you have done one, you just don't know what you're gonna need that you can't get your hands on in Australia or for a lot of money from the US.
Now, cupboards...
I didn't have weight issues to deal with because mine is permanently sited. I used 1.8mm (I think) MDF. It is strong and looks better than thinner materials.
You're right, you'll need to go with something much lighter.
Airstream uses a thin ply - I think it's 4mm or 5mm. It is very strong for it's weight. If you get an interior you'll have some of this that you might be able to re-use. Bunnings sells something similar. Speak to cabinet makers, they'll tell you what is light and strong and can be prepared with a Laminex or Formica finish.
Speak to boat builders too. They are used to building light, whether resilient interiors into very difficult, curved settings.
Ceiling...
I posted an answer to a question about it on Airforums...
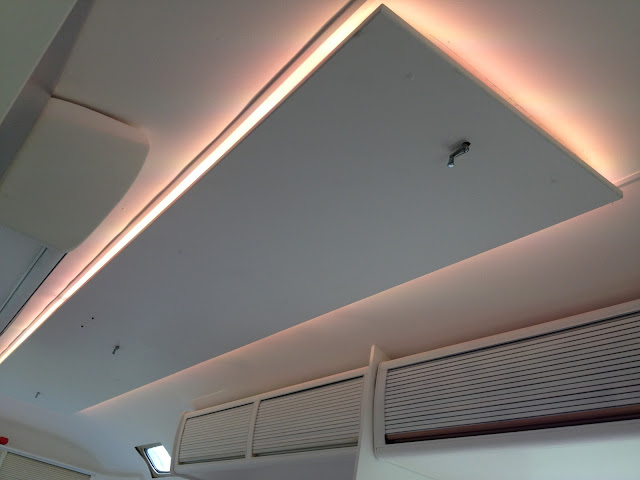
[The ceiling panel only drops 2.5 inches down into the space at the highest point to the button of the panel (considering the ceiling behind it is curved). Measuring from the floor back up, you'd have to be 6 foot 4 inches before needing to duck.
That means it really isn't any lower than the original (and in my opinion quite ugly) plastic light fittings / vent grills. The intrusion is virtually unnoticeable - It certainly doesn't feel like the ceiling has been pulled down or anything. I really wanted to get rid of those vent covers and this was the best way I could think of.
The vents are all still operational and as you can see in the pic, lighting is provided by an LED strip that runs in a channel recessed around the upper side of the panel. They are dimmable (actually full RGB color adjustable) via an infrared remote. I have them wired into the main switch by the door.
The panel is stepped off the ceiling on batons that run port - starboard which were fixed through the interior skin into the ribs.
I was slightly worried about the possibility of water leakage onto the panel should somebody leave a vent open in a rainstorm so I have routed electronics on top of the panel away from the vents. I've also applied 5 coats of marine varnish to the top of the MDF panel which should keep it dry until I can clean up if the unfortunate does occur.]
I may do a post on this on the blog with some pics. Let me know if this would help.
I hope this helps.
Matt.
: )
ReplyDeleteThanks Rob.
Yeah, I have been working from it. Performs really well.
Having said that, I'm working in Sydney right now.
M.
What are you going to put in the empty space across from the couch?
ReplyDeleteGood question.
ReplyDeleteI'm a designer and I use it to post ideas as I'm working through them. Right now there are a bunch of sticky notes up there. Sometimes it's sketches or user research notes etc.
It's a big space to dedicate to anything but externalising design ideas is an important part of my process.
Matt.
Hi Matt,
ReplyDeleteCongratulations on renovating it by yourself - it looks great!
We're in the process of having a 1960s Airstream renovated in the US right now which we plan to ship to Melbourne. We've just started documenting its progress at airstreamfamily.com.au
Thanks so much for the advice on your blog re: importing. Its been incredibly helpful. Cheers Sonia
Thanks Matt, your studio is so cool, and you have inspired me to start investigating doing something similar for my retro-architectural practice. As a result of this blog I have just contacted Mark the Airstream guy in America to start research. Keep up the great work, Alistair @ Secret Design Studio, Melbourne
ReplyDeletematt....its fantastic
ReplyDeleteive wanted to create something similar for years and and an airstream has been on my mind
im glad i found your blog and will look forward to seeing how its goes
i was more focussed on the home that I would love to be in but that i could bring any where
i can work any where that has humans and id like to do it with a little style
youve proved a few things to me
ta
doug
This comment has been removed by a blog administrator.
ReplyDeleteThis comment has been removed by a blog administrator.
ReplyDeleteYou've done a really great job on your renovation! It looks fantastic. What a shame its not portable so you can come and join us at Australia's first Airstream Rally in Tathra this October!
ReplyDeleteHopefully oneday when we visit Byron in our HofArc renovation we can come and bring it to show you!
Kindest Regards, Sonia
airstreamfamily.com.au
This comment has been removed by a blog administrator.
ReplyDeleteHey Matt, I am assuming from the posts that you didn't get the trailer road registered? Have you got any contacts that might know about modification requirements for road registration?
ReplyDelete